How to
A video under a minute: from creating a queue to the display on a TV. All video lessons
Pick what you want to set up: every step has an "Open" button that leads straight to the right block of your account.
Create a queue and the steps get "Open" buttons straight into its settings. Create a queue
Getting started
Put up a QR code and serve the first visitorsVisitors join the queue from their phones, and you call them with the "Next" button.
- 1Create a queue: the "Create a queue" button on the home page or in your account. The name and industry can be changed later.Open
- 2In the "Screens" tab open "QR code" and print a poster or a sticker: the code leads to your queue page.
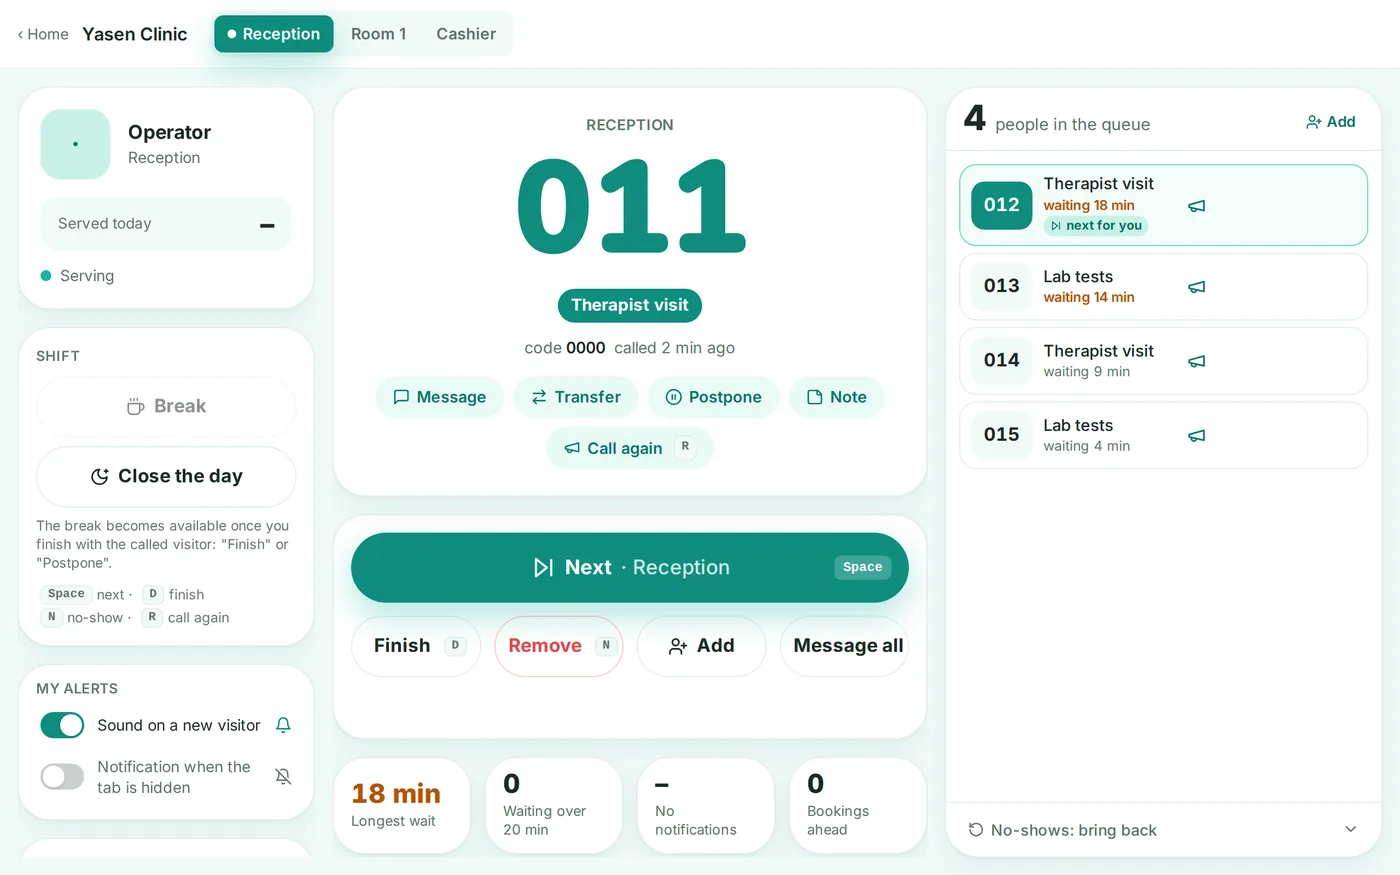
- 3There, open the "Operator screen" on a computer or tablet at the desk: "Next" calls a person, "Finish" closes the visit.
- 4Put the poster at the entrance. The first visitor scans the code, gets a number, and you see them in the list.
Put the display board on a TVA TV in the hall shows called numbers and windows and announces them by voice.
- 1In the "Screens" tab copy the "Display board" link and open it full screen in the browser of the TV or a set-top box.
- 2In the "Display & texts" tab choose the layout, theme and zone captions, upload the logo.
- 3In "Behaviour" turn on the sound and the voice announcement, and pick a voice if you like.
- 4For several halls add screens in the "Multiple screens (multi-display)" block and select which windows each one shows.
A truck driver queue at a warehouseA driver joins by QR at the gatehouse, enters the plate number and waits in the cab, and the call to a gate comes to the phone and the board.
- 1In the "Overview" tab, in the "Industry template" block, choose "Warehouse: driver queue" and press "Apply". The template sets up four gates, the "Loading", "Unloading" and "Documents" services and a driver form.
- 2In the "Windows & services" tab adjust the number of gates and their names. To have a gate take only loading or only unloading, attach services to it (Business plan).
- 3In the "Form" tab check the fields: plate number, phone, carrier and waybill number. The plate is brought to the "A123BC 77" format however it was typed, and the clerk sees it as a plate. The form is asked only by a queue with a verified account.
- 4If you want the plate on the board too, turn on "Show the plate number on the display" in the "Display & texts" tab: it appears only for the truck being called.
- 5Put the QR code up at the gatehouse and open the board on a TV by the gates. The clerk at a gate presses "Next", and the driver gets the gate number.
Set up a kiosk with ticket printingA visitor without a smartphone taps a button on the tablet at the entrance and gets a paper ticket.
- 1In the "Screens" tab open the "Kiosk" link on a tablet and pin the tab full screen.
- 2Connect a receipt printer to the tablet: turn on "Print ticket at the kiosk" and the ticket goes through the browser print dialog. For printing with no dialogs set up silent printing, see the scenario below.
- 3In the same block choose what the kiosk shows: services, languages, a QR code for phones.
Print tickets with no print dialogsBusinessThe ticket comes out of the receipt printer by itself: a large number, the service, how many people are ahead and a QR code for the ticket.
- 1Put a 58 or 80 mm receipt printer at the desk. A network one is the simplest: it plugs into the router with a cable and prints its address on the test page.
- 2In the "Screens" tab, in the "Silent printing on a receipt printer" block press "Connect a printer" and copy the key: it will not be shown a second time.
- 3Download the printing program and unpack it on the computer at the desk: /print-agent/README.txt. It also explains what to put in config.json and how to start the program together with Windows.Open
- 4Come back to the dashboard and press "Test ticket". If it comes out, printing is set up: it will say "printer online" next to it.
- 5Choose what to print there as well: only kiosk tickets or every issued ticket, including those the operator adds.
- 6No computer at the desk? A network Star or Epson printer prints from the cloud by itself, with no program: see the "Print tickets on a cloud printer" scenario below.
Print tickets on a cloud printerBusinessA network Star or Epson printer fetches tickets over the internet by itself: no computer or tablet at the desk.
- 1A Star with CloudPRNT (mC-Print2, mC-Print3, TSP100IV) or an Epson with Server Direct Print (TM-m30II, TM-m30III, TM-T88VI) will do. Connect the printer to a router with internet by cable.
- 2In the "Screens" tab, in the "Silent ticket printing" card, press "Connect a cloud printer", choose Star or Epson and press "Get the printer address". Copy the address: it will not be shown a second time.
- 3Open the printer settings in a browser at its IP address (it is on the settings page the printer prints when switched on with the paper feed button held).
- 4Star: the CloudPRNT section, the address into Server URL. Epson: the Server Direct Print section, the address into the Server 1 URL field. Poll every 5 seconds, save.
- 5Come back to the dashboard: within a minute the card shows "printer online". Press "Test ticket".
Set up the kiosk on an Android tabletThe tablet at the entrance works like a terminal: only the kiosk, full screen, it starts by itself after a reboot and prints tickets on a receipt printer.
- 1Install the "Minutka Kiosk" app on the tablet from Google Play.
- 2In the "Screens" tab, in the "Kiosk" card, press "Get a pairing code". To print on the tablet printer, first turn on "Print tickets on the tablet printer" (Business plan).
- 3In the app press "Connect the kiosk" and point the camera at the QR code or type the code. The code is valid for 10 minutes and works once.
- 4The app settings open with five taps in the top left corner and the PIN you set when connecting. There you find the printer, a test print and disconnecting the kiosk.
Invite staff and set accessEach staff member has their own login, and you see who served whom.
- 1In the "Staff" block invite a person by email and choose a role: an operator calls and serves, an administrator also configures.
- 2The staff member opens the email, signs in via the link and sees only their queues.
- 3A report on each staff member lives in the "Staff" section of your account (Business Pro plan).Open
Put a quick guide up at the operator windowA new staff member knows from day one how to sign in and what each button does: an A4 sheet hangs at the workstation.
- 1In the "Screens" tab, in the "Staff" section, find the "Operator screen" card and press "Printable quick guide".
- 2The sheet has the operator screen address and a code for the PIN sign-in, the six main buttons with their keys and three rules. It carries no keys and no personal links, so it is safe to hang in plain sight.
- 3Press "Print": one A4 sheet at 100% scale. Put it up at the workstation. The guide exists for a live queue: in booking and orders modes the operator screen is different.
Set opening hours, lunch breaks and holidaysThe queue and bookings open and close on schedule by themselves, and the visitor sees when you open.
- 1In the "Behaviour" tab, in the "Time and schedule" block, check the time zone and set the "Opening hours": the days, the "Open" row and the "Break". If the hours differ by day, press "Different hours per day".
- 2In "Special days" in the same block add holidays and short days: a date, "Closed" or "Different hours", and a note. Bookings on a closed day are not cancelled automatically, and the dashboard names the dates.
- 3Hours of a single service (Business plan): in the "Windows & services" tab type the hours in the service row or press its calendar button to set hours per day.
- 4Booking hours (Business plan) are set in the "Operating mode" block: "Booking hours", and the "Same as the live queue" button copies the opening hours. A specialist has their own hours with a break in their schedule.
Visitors
Take appointments by timeBusinessA visitor picks a day, a time and a specialist, gets a reminder, and you see the bookings in the operator schedule.
- 1In the "Overview" tab, in the "Operating mode" block, choose "Appointment booking". The "Live queue plus appointments" option comes with the Business Pro plan.
- 2Further down the same block set "Booking hours": days, hours and a break, and press "Different hours per day" if the hours differ by day. There too set the slot length ("Slot, min") and how many people per slot ("Spots per slot", it can differ per weekday).
- 3Further down the same card add specialists: a name, a window or an employee from the directory with a photo, and their own schedule by day.
- 4A reminder before the visit goes out by itself to the messenger, push or email, whichever the visitor connected. How many hours ahead is set by "Remind before, hours" in the same card.
- 5With two or more specialists, turn on the "Any specialist" option there too: the visitor picks only a time, and we assign the specialist, the least busy one or the first free one in the list.
Keep clients when everything is bookedBusinessWhoever finds no free time joins the waitlist, and a freed time reaches them in a messenger, the browser or by email.
- 1The waitlist needs no separate switch: it works with appointments while "Allow self check-in" is on in "Behaviour". On a day with no free time the visitor taps "Notify me if a time opens up" and picks where to be notified: Telegram or the browser.
- 2To offer email on the waitlist too, turn on "Emails to the visitor" in the same place (Business Pro plan).
- 3Decide who gets the time: in the "Overview" tab, in the "Operating mode" block, set "Hold a freed time for the first person on the waitlist, minutes". 0: everyone is notified at once and the time goes to whoever books first; from 5 to 60: the time is held for the first person on the list.
- 4The day schedule shows "On the waitlist: N" and a held time as "Holding 10:30 for the waitlist until 10:52". To give that time to a client on the phone, press "Release".
- 5The "A time has opened up" message takes the client straight to booking that time, and they can leave the list on the booking page, in the bot or with the link in the email.
Book several people at onceBusiness ProOne person books several at once: each with their own service and specialist, a time is found for everyone, and a single confirmation arrives.
- 1Group booking sits on top of appointments: in the "Overview" tab, in the "Operating mode" block, a mode with appointments must be selected and specialists added below.
- 2In the same card check the "Book several people at once" toggle: it is on by default. Switch it off if you always see one person at a time.
- 3On the booking page the visitor gets "Add another person": up to six people, each with their own name, service and specialist. The order in the list matters and can be changed with the arrows.
- 4We ask for a name for everyone except the first person: the first one is whoever is booking, and their name comes from the usual form. When "Ask for visitor details" is on in the "Form" tab, a name is required for everyone; otherwise it can be left empty. The specialist sees the names in the day schedule and in the ticket list, next to the "a group of" mark.
- 5A time is picked for the whole group. "Together": everyone starts at the same time with different specialists. "One after another": a single specialist sees them back to back, with no waiting in between. When no "together" option exists, the visitor is told why.
- 6The confirmation and the reminder go out as one message for the whole group and list by name who is seen at what time. The visitor can cancel one person, cancel the whole group, or move the entire group to another time.
- 7What a group cannot do: one person fills in the form with the phone and email for everyone, the others are only asked for a name, and a group does not join the waitlist: it can only offer one freed spot.
Notify visitors in messengers and by emailThe visitor leaves the hall and gets "your turn" in Telegram, as a push notification or by email.
- 1Messengers and push work out of the box: on the ticket page, right under the number, the visitor taps "Get notifications" (on an iPhone they then pick a messenger).
- 2For emails turn on "Emails to the visitor" in "Behaviour" (Business Pro plan).
- 3Add an "email" field to the form in the "Form" tab: the address from the form subscribes the ticket by itself.
- 4Write your own call, reminder and confirmation texts in "Custom notification texts" of the "Flow and limits" block (Business Pro plan).
Fewer no-shows and empty callsPeople who changed their mind leave the queue in one tap, a silent visitor gets "Are you coming?" after the call, and an unconfirmed booking frees its time in advance.
- 1In the "Behaviour" tab, in the "Flow and limits" block, choose how soon to ask a called visitor "are you coming?": a silent visitor gets a question with an "I'm on my way" button, and the operator sees the answer.
- 2In the same block, in the "When a called visitor does not come up" row, choose "Call again" if people need a second chance: the second time the ticket closes.
- 3In the same tab turn on "Ask visitors to confirm they are coming": together with "your turn is coming up" people get "On my way" and "Leave the queue" buttons, and the operator sees who confirmed and who is silent.
- 4People who do not want a long wait do not take a ticket "just in case": on the queue page they ask to be notified when it is shorter and get one message with a link. It is on by default; turn it off with the "Offer 'notify me when it is shorter'" row.
- 5For appointments (Business plan), in the "Operating mode" block set "Confirm booking, hours": an unconfirmed booking is released in advance, and the time goes to the waitlist.
- 6Nothing else to turn on: the "Leave the queue" button in the messenger, the cancel link in emails to the visitor (Business Pro plan) and changing a booking on its page work by themselves.
Check-in and a late windowBusinessA booked visitor taps "I'm here" on their own, staff see who is in the room and who is running late, and a booking without a check-in can cancel itself after the late window.
- 1In the "Overview" tab, in the "Operating mode" block, set "Late window, minutes": the visitor sees the rule "You may be up to 15 min late." when booking, on the booking page and in the reminder.
- 2Open "QR code", choose "Check in" and put this poster up in the room: with it a booked visitor taps "I'm here" or enters the number and code from the confirmation.
- 3In appointment mode the kiosk checks people in by code on its own, and in the "Live queue plus appointments" mode (Business Pro plan) it has an "I have a booking" button for that.
- 4To have a booking without a check-in cancel itself, turn on "Cancel the booking after that" in the same block. Turn it on only if people check in, otherwise it also cancels those already waiting in the room.
- 5The client arrived after "No-show" or after the late window cancelled the booking: press "Bring back booking" in its schedule row, and the booking returns marked as arrived.
- 6The operator schedule shows "arrived at 10:05", "arrived early", "running late, arrives at 10:10" and "not checked in", and the "Mark as arrived" button (a person with a check mark) checks in the person at the desk.
Show your business on the mapVisitors see the pin on a map next to the address, and in a network with a public page the locations appear on a map with their waiting times.
- 1In the "Contacts" tab, in the "Contacts and rating" block, press "Pick on the map" and click where the entrance is, or press "Use my location" while at your business.
- 2Adjust the pin by clicking the map or dragging it. The pin does not turn on the "Ticket only on site" geofence: its centre is set separately on its own map with the radius circle.
- 3Visitors open the map with the "Show on map" button in the contacts, and on the network page "Where it is faster right now" they see every location on the map plus a "Show nearest" button.
Let people join on the way, call only those who arrivedPeople take a ticket in advance, "Next" calls them only after "I'm here" near the venue, and a ticket without a confirmed arrival is removed on its own after five skips.
- 1In the "Contacts" tab, in the "Contacts and rating" block, while at the venue, press "Turn on: capture point here" under "Ticket only on site" and pick a radius.
- 2In the same place turn on "Join in advance, confirm arrival on site": a ticket can be taken on the way, and "Next" calls the person only after "I'm here" within the radius. With the rotating QR the switch has no effect.
- 3On the operator screen such a number is marked "arrival not confirmed" with the number of skips left. When the person is at the desk, press "Mark as arrived" (a person with a check mark) in their row.
- 4An unconfirmed number can also be invited manually, after the "Invite anyway?" question. If only unconfirmed people are waiting, "Next" tells you what to do.
- 5After five skips without a confirmation the ticket is removed and the person gets a message. If they come later, bring them back from "No-shows: bring back" within three hours: they return marked as arrived.
- 6How many tickets were removed this way is shown in period analytics (Business plan), in the "How unfinished tickets ended" block: the "Joined in advance, never confirmed arrival" row.
Collect ratings and reviewsAfter the visit the visitor leaves a rating: happy ones go to the map reviews, unhappy ones write to you.
- 1In the "Contacts" tab, in the "Contacts and rating" block, turn on "Ask for a service rating" and add the link to your reviews.
- 2In the same block turn on "Offer to leave a review on the map" (the label names your service, for example Google Maps): the rating request also arrives as a browser notification, and people who give 4-5 stars in the bot get your reviews link.
- 3Put a rating tablet at the window: the link is in the "Screens" tab.
- 4See average ratings and visitor comments in the queue analytics.
- 5The owner alert about a low rating is turned on in the account settings (Business Pro plan).Open
Show an offer while the visitor waitsBusiness ProThe ticket page and the bot before the ticket carry your image with a caption and a button.
- 1In "Behaviour" open "Message before the ticket": upload an image, write a caption and a link.
- 2Turn on "Show on the ticket page": everyone waiting with the page open sees the same block.
Serving
If the desk loses its connectionThe operator screen does not go blank and does not lie: the list stays, the calling buttons go quiet, and ticket marks are sent by themselves once the connection is back.
- 1The operator screen always shows a connection marker in its header: a green "online" means the list is correct right now.
- 2If the connection drops, the screen stays usable. The list and the called visitor are still there, and a notice at the top tells you the time the data is correct for.
- 3The "Next", "Invite" and "Repeat call" buttons stay quiet meanwhile: a minute later the wrong person would come to the window.
- 4"No-show", "Finish", "Postpone", marking an arrival and the priority mark work without a connection too: they wait and are sent by themselves. Do not close the tab.
- 5When the connection is back, the header turns green, a short sound plays and the waiting marks are sent. If another operator has already closed a ticket, the screen says so and nothing is done twice.
- 6If the outage drags on, check the desk Wi-Fi and press "Check again". Keep serving people as usual: the screen will send the marks on its own.
Online consultations by appointmentBusinessThe client books as usual, gets the video meeting link in the confirmation and the reminder, and sees a "Join the meeting" button on the booking page before the start.
- 1In the "Overview" tab, in the "Operating mode" block, find "Online meetings" and choose "Fixed link" or "Own link for every booking" for all bookings, a service or a specialist.
- 2For a fixed link, paste the room address of your video call service: any link that starts with https:// works. A specialist link overrides a service link.
- 3If every booking gets its own link, paste it in the schedule with the "Add the meeting link" button: the client gets it in a message right away.
- 4In the schedule such bookings are marked "online" and have "Open the meeting" and "Copy" buttons. Only the client and staff see the link, it is not on the board or the kiosk.
Several windows and services per windowBusinessEach window calls only its own services, and on the Business Pro plan a visitor follows a route through the front desk, the doctor and the cashier on one ticket.
- 1In the "Windows & services" tab set the number of windows and their names.
- 2Add services and assign them to windows: a window takes its own services and tickets without a service.
- 3The "then" route (Business Pro plan): set the next service for a service, and after the visit the ticket moves to the next window by itself.
See which hours are the busiestBusinessTwo charts for the period: when people join the queue and when you serve them, bookings and walk-ins separately.
- 1Open the queue analytics and pick a period: today, 7, 30 or 90 days, or a custom range.
- 2"Arrivals by hour" shows how many people join the queue on average in each hour of a working day. Hover over a point or tap it to see the number.
- 3In "Visits served by hour" switch between "All", "Bookings" and "Walk-ins": you see which hours the windows spend on bookings and which on the walk-in flow.
- 4The hour scale follows your opening hours: set them in the "Behaviour" tab, the "Time and schedule" block.
- 5Where more people join than you manage to serve, open another window for those hours in the "Windows & services" tab.
Find where visitors drop offBusinessThe visitor journey, visit outcomes and the places in line people leave from, for the chosen period.
- 1Open the queue analytics, pick a period and the "Guest experience" tab.
- 2"Visitor journey" shows how many people left before the call and how many missed it.
- 3"Where in line people leave" shows from which place in line people stop waiting.
- 4Press "Details" on a chart to open a table by day and hour; you can export it to CSV or Excel.
- 5The same charts across all queues or for a network: "Analytics" in the account menu, the "Charts for the period" block.Open
- 6To see new and returning visitors (Business Pro plan), add a phone field in the "Form" tab.
One window for several queuesBusiness ProA reception or a cash desk calls the first in the common order from several of your queues.
- 1In "Behaviour" open the "One window for several queues" block and tick the queues this window also calls from.
- 2On the operator screen tickets from other queues are marked with the queue name, and "Next" takes the first in the common order.
- 3The window stays this queue's window: the board, the ticket page and the notifications name it for a person from another queue, and that queue's operators keep calling to their own windows as before.
Breaks, closing the day and number resetThe board honestly shows "break until 14:00", the day closes with one button, and in the morning numbering starts from №1.
- 1On the operator screen press "Break" and pick a reason: the window goes on a break for its time right away, and visitors and the board see when you are back.
- 2In the evening press "Close the day": the queue clears, and the history stays in analytics.
- 3Turn on the automatic day close with a number reset in "Behaviour", in the "Time and schedule" block: the "Close the day automatically" row.
Set the break buttons for operatorsOperators see only your reasons with icons and times, and the board never shows anything you did not write.
- 1In the "Display & texts" tab open the "Break reasons" block: up to six reasons, each with a name, an icon and minutes.
- 2The eye on a reason decides whether the room sees it. Without the eye the board just says "Break until 14:00".
- 3A network has the same block in the network settings, the "Display" tab: locations take the reasons from the network.Open
Ask for help and leave a note for the shiftAn operator asks for help with one button, the other windows see the call, and you get a message in Telegram.
- 1Connect the alert chat in the account settings: "Window 2 asks for help" arrives there.Open
- 2On the operator screen the "Ask for help" button comes with a reason. The other windows see a banner and tap "Coming".
- 3Next to it: a "Note for the next shift" at the window for the next operator and, for an admin, "Message to all windows".
Count people in the hallBusiness ProThe operator marks who entered and left, the board shows "12 of 20 inside", and when the hall is full people wait at the entrance.
- 1In "Behaviour", in the "Flow and limits" block, set the "Room capacity".
- 2The operator screen gets the "Entered" and "Left" buttons. When a place frees up, the first person waiting gets a message.
Event: guests on one Wi-Fi networkBusinessFor the event the queue raises its per-address limits so that guests on one network can take tickets, and one phone holds at most two live tickets.
- 1In "Behaviour", in the "Flow and limits" block, set the "Capacity" or the "Daily quota": the mode does not turn on without them.
- 2In "Flow limits" in the same block turn on "Shared Wi-Fi at the venue", choose how many tickets a minute one address may take and until when the mode applies.
- 3To have tickets taken only in the hall, turn on the "Rotating QR on the board": it comes with the Business Pro plan.
Move or change a client bookingBusinessStaff change the time, specialist, service and client details in one window, the client gets "Booking changed", and the booking time can be given to another person.
- 1Open the bookings schedule: in appointment mode it is the operator screen, and in the dashboard administrators and the owner press "Bookings for the day" in the "Operating mode" block.
- 2In the booking row press the pencil button "Edit booking", choose the new time, specialist or service and keep the "Notify the client about the change" tick.
- 3If you type in the client details yourself and the queue collects visitor data, tick "The client has consented to the processing of their personal data".
- 4Another person came or called: in the same window tick "This is a different person", enter their details and save. The old booking is cancelled, and the window shows the new number and code: tell them to the client.
- 5See who changed what in the "Activity log" of the "Staff" block.
See the day by specialist and move bookingsBusinessThe whole day on one screen: a column for each specialist, their hours and breaks, bookings sized by length. A booking is moved by dragging, and a client is booked by pressing a free time.
- 1Add specialists and their schedule by day: in the "Operating mode" block below the booking hours.
- 2Open the bookings schedule (the operator screen or "Bookings for the day" in the dashboard) and choose the "By specialist" view. Use the arrows to switch days and the filters to keep one service or specialist.
- 3The specialist works during the light time, not during the hatched time. Press a free time in a column: "Book a client" opens with that specialist and time already chosen.
- 4To move a booking, drag it to another time or into another specialist's column (on a phone by the dotted handle) and confirm "Reschedule". Pressing a booking opens its card with buttons, including "Edit booking".
Handle bookings alongside the live queueBusiness ProThe live-queue operator opens the bookings schedule and books, invites, checks in, edits and brings back bookings without leaving their screen.
- 1In the "Overview" tab, in the "Operating mode" block, choose "Live queue plus appointments".
- 2On the operator screen press "Bookings" or "All bookings" next to the "Upcoming appointments" list: the bookings schedule by day opens.
- 3A booking row has the same buttons as in appointment mode: "Mark as arrived", "Invite", "Edit booking", "Cancel booking", and "Bring back booking" for a no-show of today.
Open the visitor in your own system with one buttonBusinessNext to the called visitor the operator presses "Medical record" or "Client in 1C", and the record opens right away by their phone, with no retyping.
- 1In the "Integrations" tab open "Operator buttons" and press a preset: medical system, ERP, CRM or "Call".
- 2Replace the server and database in the address with yours. Visitor details go in as placeholders after the server name: {phone}, {name}, {ticket} or {field:Policy number}.
- 3Press "Check": the card shows the address for a sample visitor. Then press "Save".
- 4On the operator screen the buttons sit under the called number. If the visitor has no phone in the form, the button is greyed out with a hint why.
Money
Service prices and revenue in analyticsBusiness ProEach service has its price, the visitor sees it when choosing, and you see revenue by day and by staff member.
- 1In the "Windows & services" tab set service prices and the general visit price, and turn on showing prices to visitors.
- 2Revenue is counted from served tickets and shown in the queue analytics and in reports.
Pay for a plan and add windowsPaid features switch on right after payment, and windows are added one at a time.
Branding and network
Brand it your wayBusinessThe board, the poster, the ticket page and the QR code in your colours and with your logo.
- 1In the "Display & texts" tab, in the "Appearance" block, upload the logo, set the colour, the font and the board background.
- 2There, choose the QR code style: classic or soft with dots, with the logo in the centre.
- 3Set your own board zone captions and the visitor note in the "Texts" block.
Make the number on the display biggerThe number, the place and the arrow are readable from the far corner of the room.
- 1In the "Display & texts" tab, in the "Sizes and layout" block, turn on "Large when few are called": one or two calls fill the whole zone.
- 2There, use the sliders to make the number, the place with the arrow, the waiting numbers or the ticker bigger.
- 3In "Screen calibration" enter the TV size and the distance to the farthest seat in metres: the number never gets smaller than is readable from there.
- 4The "1 call", "5 calls" and "12 calls" buttons above the preview show the display on a busy day.
Build your own display layoutBusiness ProCalls, waiting, ads, the clock, the logo and the QR code sit where your room needs them.
- 1In the "Display & texts" tab, under "Display design", choose the "Display builder" tile.
- 2Press the preset closest to your layout: "Modern", "Classic", "Call board", "Advertising" or "Portrait".
- 3Click a part to select it and drag: by the middle to move it, by an edge or a corner to resize it. A part never shrinks below what its text needs.
- 4Below, change the style of the selected part and the size of its content, and add new parts under "Add a part". The clock, the QR code and the logo can sit on top of other parts in empty space.
Style the kiosk like the displayBusinessThe entrance tablet looks like one set with the display: the same background, your button colour and your words above it.
- 1In the "Screens" tab, in the "Kiosk" section, find the "Kiosk look" block.
- 2Press "Like the display" and the kiosk takes the display's background and dark theme. Or choose "Custom": a background and the colour of the "Take a ticket" button. A colour the button would be hard to see in is not saved, and "Pick a readable colour" suggests one that works.
- 3Write a heading above the button and a text under it, for example "Tickets for tests are issued at the front desk". They work in any mode.
- 4On the right is the real kiosk screen: switch between "Main screen" and "Your number", "Landscape" and "Portrait".
Show an announcement on the displayA large bar over the display on every screen of the queue, for example "Desk 3 is closed".
- 1On the operator screen press "Display announcement".
- 2Write the text, choose how long it stays and press "Show on the display". The voice does not read it.
- 3To remove it earlier, press "Remove from the display" in the same place.
See what is on the display in the room right nowA snapshot of each display taken by the screen itself, whether it is online, and reloading every display with one button.
- 1In the "Screens" tab open the link from the "Display board" card on the TV: it carries a screen key. Within a minute the screen appears in the "What is on the display now" block.
- 2Press "Refresh snapshots": every screen photographs itself, and the snapshots appear in a few seconds.
- 3A screen froze, or you changed the link or the design: press "Reload displays" and every display of the queue opens its page again.
Put a screen above a windowAn old phone or tablet above a window shows the number at that window, a break or "Available".
- 1In the "Screens" tab find the "Screen above a window" card and pick the window.
- 2Open the link on the phone: point its camera at the QR code in the card or copy the link.
- 3Mount the phone above the window. The screen stays on by itself; if it goes dark, turn off auto-lock in the phone and keep it charging.
Show an announcement on every network displayBusiness ProOne bar over the display in every location at once, for example "Today all branches close at 15:00".
- 1In your account open the network settings and the "Display" tab.Open
- 2In the "Announcement on every network display" block write the text, choose how long and press "Show on every display".
- 3To remove it earlier, press "Remove from every display" in the same place.
A network of locations with combined analyticsBusiness ProSeveral locations under one roof: a shared brand, combined analytics and a "where is it faster now" page.
Staff sign-in with a corporate account (SSO)CorporateStaff sign in with their company account (SAML 2.0 or OpenID Connect), newcomers are added automatically with the right role, and people who leave lose access together with their account.
- 1In the account "Settings" open the "Corporate sign-in (SSO)" block and choose SAML 2.0 or OpenID Connect.Open
- 2At your provider enter Minutka's metadata URL or the Redirect URI, and in the block upload the provider metadata or enter its sign-in URL and certificate.Open
- 3Add your company email domain, put the TXT record into its DNS and press "Check".Open
- 4Choose the role for new staff and the group rules, press "Test connection" and turn sign-in on. "SSO only" turns passwords off for staff. When you save the provider details or turn sign-in on, the account asks for your password.Open
All features
A detailed description of every setting by section: for those who want to know everything.
Plans and payment
The free plan covers unlimited queues, up to two windows per account and two staff members per queue, notifications, a kiosk and a display board with voice calls. For organizations: "Business" $49/mo for 10 windows (services, appointments with specialists, your own branding, media and advertising on the board, period analytics) and "Business Pro" $79/mo for 30 windows (no badge from us, Excel export, forecasting, multiple sites with combined analytics, open API, webhooks and CRM, centralized roles). Extra windows are added one at a time. Billing is per window, not per location or visitor — monthly or yearly at a 20% discount, by card: access opens right away.
When you sign up, the Business Pro plan is connected for 5 days: every feature is open, no card needed and nothing is charged. After 5 days the account moves to the free plan on its own — whatever you configured is kept, only the paid extras switch off. The end date is shown in the cabinet on the left, under the plan name.
We reply within 2 to 4 hours.